How to Transport Artwork Safely: Tips for Packaging, Shipping, and Handling

Intro & Scope
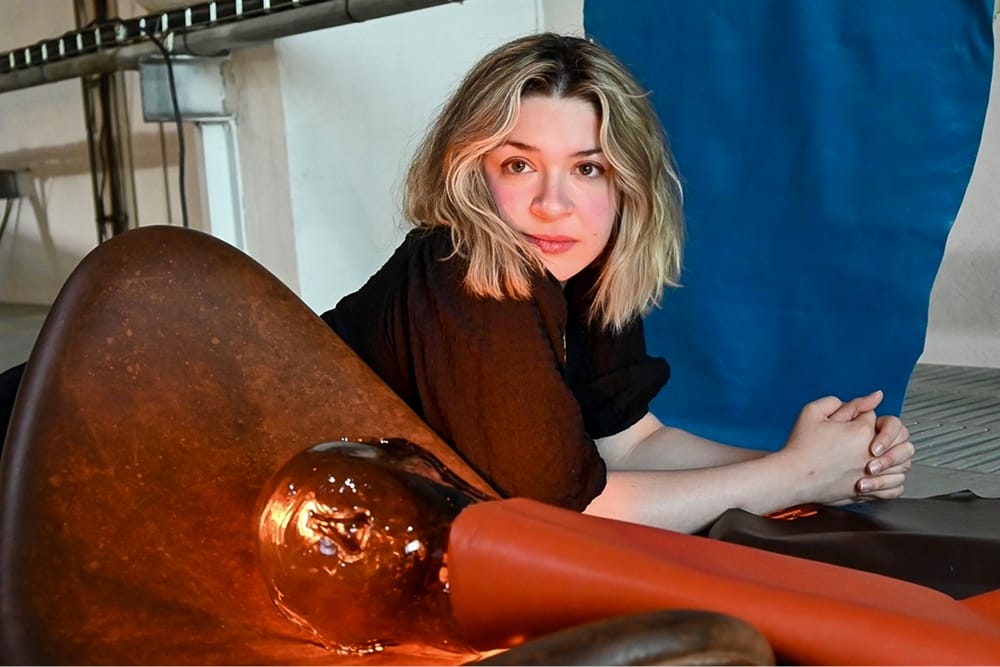
Moving art takes craft, precision, and risk awareness. At subjektiv.art, we’ve packed canvases in attic studios, arranged trans-Atlantic shuttles, and watched vibration sensors flicker inside cargo jets. This guide compresses our experience into one practical resource, whether you're rolling a print or building a climate crate for a six-figure piece.
Purpose of This Guide
Our goal is simple: help you move art without damage or drama. To achieve that, we:
- Use museum-grade standards (CCI, ICOM, ASTM) and real-world studio tips
- Offer clear steps, tool lists, and templates, no jargon
Prioritise sustainable methods so the art doesn’t outlive the planet.
Who Should Read It (Artists, Galleries, Collectors, Couriers)
Independent Artists & Studio Assistants: to save on costs and protect original work.
Galleries & Advisors: to avoid claims and protect client trust.
Private & Institutional Collectors: to preserve long-term value and meet insurance standards.
Fine-Art Couriers & Logistics Pros: to benchmark your SOPs against updated 2025 best practices.
Key Take-aways
How to Use This Article
- Always start with a condition report - it’s your legal backup.
- Match packaging to the artwork, not the courier.
- Environmental control costs less than restoration.
- Clear tracking and hand-offs prevent lost provenance.
- Choose reusable, modular materials to reduce waste and cost.
How to navigate this guide
- Skim or dive deep—use the table of contents to navigate.
- Download the matching checklists for packing and unpacking.
- Watch for “Pro Tips”—they flag real tricks that save time and effort.
Ready? Grab a pencil (or box cutter) and jump into Section 2: Understanding Artwork Transport Risks.
Understanding the Risks of Artwork Transport
Before choosing crates or couriers, you need to know what can go wrong. Every packing decision, down to the tape you use, should respond to a specific risk. These three hazard groups are your checklist. Neutralize them before the artwork leaves the studio.
Physical Hazards: Shock, Vibration, Compression
Shock
- A 20 cm drop can crack stretched canvas or shear joints on wood sculptures.
- Use rigid backers (foamboard, honeycomb panels) and corner protectors.
- The goal: the frame takes nothing, the art absorbs nothing.
Vibration
- Long-haul trucks generate constant 0.2–2 G micro-vibrations.
- These loosen stretcher keys and flake impasto.
- Isolate the artwork using Ethafoam 220 or Plastazote inside the crate.
- Avoid air pillows—they pass vibration instead of absorbing it.
Compression
- Stacked pallets can press hundreds of kilos onto crate walls.
- Use minimum 9 mm birch ply or engineered honeycomb shells.
- Only mark “Do Not Stack” if you’ve paid extra for that option. Otherwise, expect stacking.
Environmental Hazards: Temperature, Humidity, Light, Pollutants
Temperature Swings
- Oil paint goes brittle below 10 °C. Acrylic softens above 30 °C.
- Cargo holds swing from −5 °C to 40 °C during loading and ascent.
- Climate crates with phase-change gels buffer ±5 °C for 48 hours.
- They’re cheaper than using a cold-chain truck.
Humidity
- Wood warps below 40% RH. Mould appears above 65%.
- Use pre-conditioned silica gel (target: 50% RH) inside sealed crates.
- Verify with a data-logger set to 15-minute intervals.
Light & UV
- UV spikes can hit during packing, especially under skylights or LEDs.
- Cover works on paper with UV-blocking Tyvek or Mylar before wrapping.
Pollutants
- VOCs from fresh paint, cleaners, and PVC tape can yellow varnish.
- Use archival foams and avoid plastic tape inside primary wraps.
Human-Factor Hazards: Mishandling, Theft, Admin Errors
Mishandling
- A rushed forklift operator is your weakest link.
- Mark every crate side with handling graphics.
- Add a QR code to a 1-minute handling video. (Ask us if you want the template.)
Theft & Pilferage
- Skip “Fine Art” labels. Use coded neutral ones.
- Add tamper-evident seals to all latches. Photograph them at each hand-off.
Paperwork & Labeling Errors
- One typo can send your crate to Sydney, NS instead of Sydney, AU.
- Cross-check item IDs, counts, and dimensions across all documents.
When you understand these risks, the next steps - packaging, insurance, customs, become easier. You're just matching each hazard to the right layer of protection.
Pre-Transport Assessment & Documentation
Spend five minutes up front to save five months of claim disputes later. Use this as your pre-flight checklist before any material touches the artwork.
Condition Reporting (Photography, Condition Sheets)
1. Set the stage: Use a matte grey backdrop and 5000 K daylight lamps.
2. Shoot four angles - front, back, both sides, plus close-ups of corners, labels, and flaws.
3. To reduce glare, angle your lights at 45°.
4. Record exact dimensions in millimetres.
5. Log frame size and crated size separately, customs care about both.
6. Complete a condition sheet in duplicate:
- One copy stays with you.
- One goes in a poly sleeve inside the crate.
7. Sign and date every page. Unsigned sheets aren’t valid evidence.
Valuation for Insurance & Customs
Decide early: Fair-market or replacement cost?
- Museums use fair-market. Galleries often insure for replacement (25–40% higher).
- Stay consistent across policy, invoice, and airway bill.
Update appraisals every 2 years.
- If market values change 20%+, old valuations won’t hold up.
Add buyer’s premium to declared value. It’s recoverable.
Use a pro-forma invoice:
- Include country of origin, HS code, and value in a convertible currency.
- Missing one field can trigger customs delays.
Selecting an Internal Reference ID System
Step 1. Use a three-part code: Year–Artist–Sequence (e.g., 25-NSmith-014).
Step 2. Add a check digit (Mod-10) to catch entry errors at courier desks. Keep it consistent: The same code should appear on the condition report, crate, airway bill, and tracking file.
Step 3. Use tamper-evident barcodes: VOID labels or destructible vinyl prevent swaps.
Step 4. Sync the system with your DAM or inventory app. Link photos, valuation docs, and shipping updates automatically.
Once this documentation is in place, you're ready to build physical protection around the art. Next up: Packaging Fundamentals - choosing the right wraps, foams, and supports to guard against every threat you’ve identified.
Packaging Fundamentals
Packaging is engineered protection. Every layer has a purpose. Skip one, and the whole system weakens. In this section, you’ll choose materials that cancel out the risks you identified in Section 2.
Layers of Protection Explained (Primary, Secondary, Tertiary)
Primary Layer – Surface Protection
- Direct contact with the artwork.
- Blocks abrasion, dust, and short-term humidity spikes.
Secondary Layer – Structural Support
- Prevents flexing and distributes pressure.
- Holds the primary wrap securely in place.
Tertiary Layer – Shock & Environmental Shield
- The crate or box.
- Absorbs impact, buffers vibration and temperature changes, and signals handling needs externally.
Recommended Materials & Their Properties
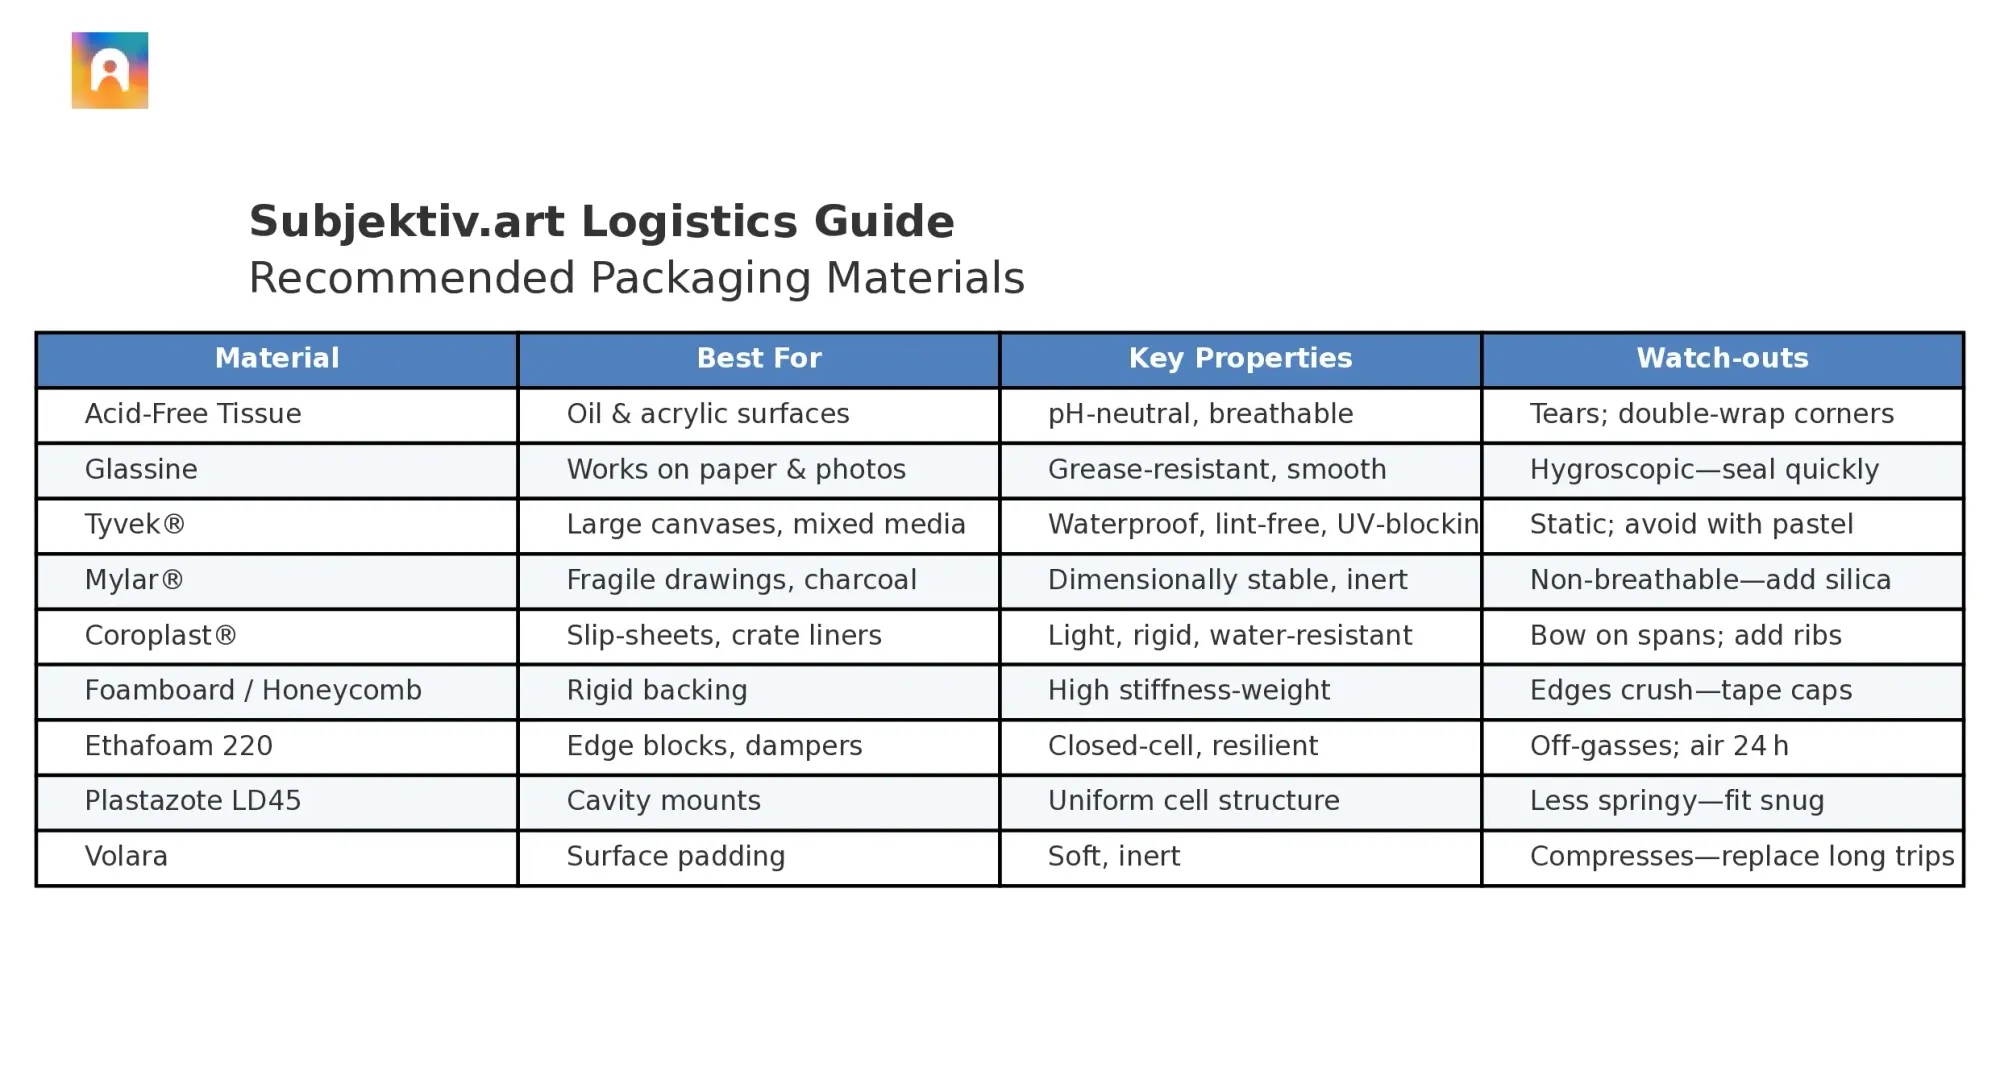
Material-pairing rules of thumb
Material pairing rules:
- Always let tissue or glassine touch the artwork unless it’s friable (use Mylar for charcoal/pastel).
- Rigid supports should exceed artwork edges by 25 mm minimum.
- Test foam rebound—after 24 h under 2 kg, it should recover 90% of original thickness.
Sustainability Considerations & Material Re-Use
- Modular crates: Use screw-fixed joints instead of glue. Replace damaged panels without scrapping the whole crate.
- Closed-loop foams: Ask suppliers about take-back programs. Many recycle Ethafoam into gym mats or playground materials.
- Bio-based wraps: PLA/PE-blends now match Tyvek’s strength at 60% lower carbon cost, ideal for disposable wraps.
- Lifecycle tracking: Etch or stencil your reference ID on each crate. It helps monitor usage and avoid fatigue failures.
- Smart crate matching: Use heavy plywood for sea freight (stacking is likely), and honeycomb board for air freight (cuts dim-weight charges).
Layer strategy? Check. Material kit? Check. You now have the strategy and the materials. Next, you’ll apply them with precision: layer-by-layer workflows based on medium. This is where the packaging turns from theory into protection.
Step-by-Step Packaging Workflows (By Medium)
These are the exact workflows we use in the subjektiv.art studio. Follow them closely for your first few shipments. Once you’ve logged safe trips, you can start optimizing for weight and budget.
Paintings on Stretched Canvas
Core Workflow
Step 1. Place the canvas face-down on a clean, padded surface.
Step 2. Add acid-free tissue to the back to catch any loose debris.
Step 3. Wrap the face in a single Tyvek® sheet. Tape it to stretcher bars, never the painted edge.
Step 4. Drop the piece, face-down, onto a pre-cut back board.
Step 5. Add corner protectors and insert into a poly bag with 300 g desiccant.
Step 6. Float-mount inside the crate on four Ethafoam 220 blocks (min. 50 mm thick), glued to a Coroplast deck.
Back-boarding & Protective Corners
Back board: 10 mm archival foamboard or 6 mm honeycomb, cut flush to stretcher.
Corners: Folded 200 gsm card wrapped in Volara. Staple to board, not stretcher.
Fit test: When upright, you shouldn’t be able to slip a credit card between the frame and back board. Add spacers if needed.
Works on Paper (Drawings, Prints, Photographs)
Step 1. Wear nitrile gloves. Skin oils lift toner and pastel easily.
Step 2. Lay the artwork face-down on glassine. Fold a 30 mm gutter so it doesn’t touch itself when rolled.
Step 3. Sandwich between two 4-ply rag boards and tape all four edges.
Step 4. Slide the sandwich into a 40-micron polyethylene sleeve with 20 g silica gel.
Step 5. Strap the sleeve to a honeycomb panel and float-mount in the crate with Plastazote bumpers.
Unframed Works & Rolled Canvases
Step 1. Interleave each roll layer with acid-free tissue.
Step 2. Never let pastel or paint touch Tyvek® directly when rolled.
Step 3. Use at least a 100 mm archival tube. Smaller diameters cause curl memory.
Step 4. Cap tube ends with foam donuts for compression absorption.
Step 5. Suspend the tube inside a double-wall corrugated case using Ethafoam cradles.
Mark all sides with “Do Not Lay Flat” and “Top Load Only.”
Sculpture & 3-D Objects
Odd Shapes & Protrusions
Step 1. Cut a negative cavity in Plastazote using a hot-wire knife.
Step 2. Reinforce thin sections (like arms) with removable Ethafoam collars, secured by Velcro straps.
Step 3. Add lift-out handles to foam insert—techs should never touch the sculpture directly.
Plinth Removal & Re-attachment
Step 1. Photograph each screw and label with colored tape.
Step 2. Bag hardware and tape it to the plinth underside.
Step 3. Pack separately if plinth weight is over 40% of total—prevents stress at the joins.
Mixed-Media / Delicate Surface Pieces (Impasto, Charcoal, Pastel)
Step 1. Attach 20 mm ABS spacer bars to the stretcher face. They keep wrap off impasto peaks.
Step 2. Build a “glass box” wrap: 300-micron Mylar supported by a foamboard frame.
Step 3. Use a split-pack desiccant—place silica gel in opposite corners to balance RH absorption front and back.
Time-Based & New-Media Works (Screens, Electronics, NFTs)
Step 1. Discharge and isolate batteries, complies with IATA Dangerous Goods rules.
Step 2. Wrap screens in antistatic bubble wrap. Add charcoal sachets to absorb vapors.
Step 3. Store media drives (SSD/USB) in fire-retardant pouches. Back up data to cloud before shipping.
Step 4. Include a printed checklist (cables, adapters, software versions) taped to the crate lid.
Step 5. Prepare NFT paperwork (wallet addresses, transaction hash) in a tamper-evident envelope.
These step-by-step guides neutralize 95% of transit risks we see in claims data. Next, we scale up - from handling objects to building crates that can survive forklifts, monsoons, and thousands of kilometres.
Building & Specifying Crates
A crate isn’t just a wooden box, it’s the last defense between your artwork and forklifts, cargo holds, and loading docks in the rain. This section outlines crate types, interior structures, and how to signal handlers to treat your shipment properly.
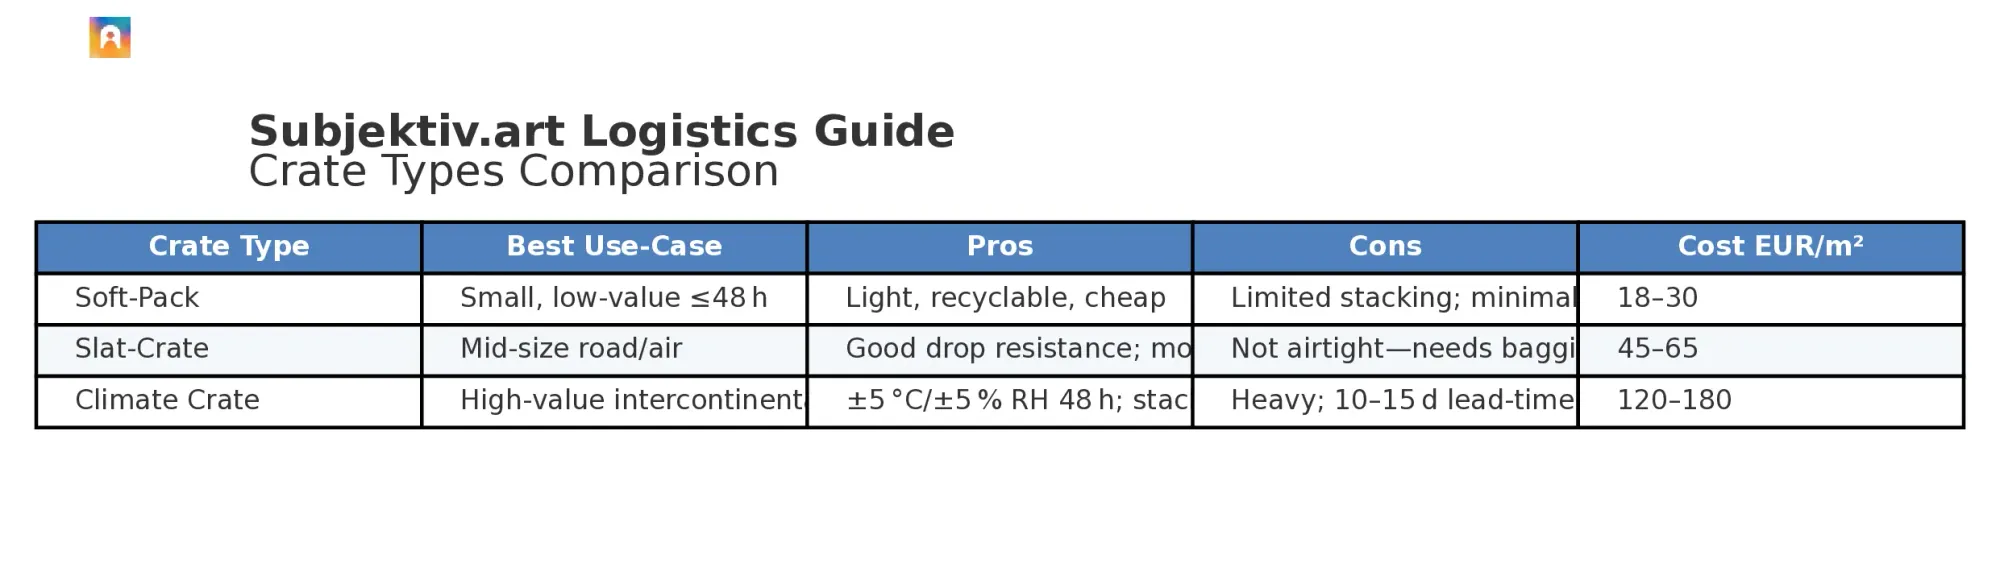
Soft-Pack vs. Slat-Crate vs. Climate Crate
Interior Blocking & Bracing Techniques
- Four-Point Float-Mount:Mount 50 mm Ethafoam blocks to the crate base—two high, two low. Keeps the artwork suspended and safe from shock.
- Cavity Box-in-Box:For fragile sculpture, use a foam cavity inside a smaller box, then float that inside the crate. Dampens both impact and vibration.
- Diagonal Bracing:Add 19×38 mm timber diagonals to long crate walls. Increases stiffness by 35% with less than 5% added weight.
- Lift-Out Handles:Router handholds into foam or use webbing loops so the artwork is never touched during unpacking.
ISPM-15 Compliance for International Wood Packaging
What It Is:A global requirement for heat- or gas-treated solid wood used in shipping across borders.
How to Comply:
- Use stamped heat-treated (HT) lumber. Look for the wheat-stalk logo + country code + “HT.”
- Keep stamps visible after crate assembly. Customs may dismantle crates to verify.
- Engineered wood (plywood, MDF, OSB) is exempt.
- Save HT certificates from your supplier and attach to your shipping docs.
Subjektiv Pro Tip: On rush jobs, use all-panel construction with aluminium corners. No solid wood = no ISPM delays.
Master crate specs and you’ll eliminate 95% of freight damage. Next: labeling, documents, and custody protocols that keep your shipment secure from door to door.
Labeling, Paperwork & Chain of Custody
Even the best crate can’t protect your artwork from a typo or missing signature. This section turns paperwork and markings into a security net that protects your shipment from studio to install.
Packing Lists & Waybills
Step 1. Print two physical copies:
- One in a zip bag on the outside of the crate.
- One taped inside the lid.
Step 2. Match internal reference ID (from Section 3.4) line-for-line across:
- Packing list
- Invoice
- Waybill
Step 3. Ensure accurate dimensions—carriers re-measure crates with laser scanners. A 3 cm error can cancel flat-rate quotes.
Step 4. Include emergency contacts: Name, mobile, email, and time zone (e.g., “+380 97 xxx xx xx (EET)”)
Digital Tracking & Barcoding Solutions
- 1-D barcodes: Quick to scan. Ideal for warehouse entry.
- 2-D QR codes: Can embed condition photos, MSDS sheets, customs docs.
- Passive RFID: Useful for galleries—scan through wrap without opening crates.
- BLE beacons: Live-feed climate and GPS data direct to your phone.
Implementation Checklist:
- Encode internal reference ID plus an 8-character check-digit.
- Use destructible vinyl or VOID labels to block tampering.
- Store scans in your asset management system.
- Set auto-alerts for missed scan points.
Your labeling and documents now act like a digital perimeter—guarding against loss, misrouting, and tampering. Up next: selecting the right transport method and partners to match your risk profile.
Selecting a Transport Method & Partner
Choosing who moves your art is part logistics, part risk strategy. This section helps you weigh transport modes, vet vendors, and time your shipment so it doesn’t sit in a snowbank or overheat in a depot.
Local Art Shuttle vs. Parcel Carrier vs. Fine-Art Forwarder
Evaluating Provider Credentials (TIA, ICEFAT, ARTIM)
What to Look For:
- TIA Certified (Transportation Intermediaries Association):Confirms freight-law knowledge and cargo insurance.
- ICEFAT Member (Intl. Convention of Exhibition and Fine Art Transporters):Audited every 3 years for climate control, secure handling, and training.
- ARTIM Network Affiliation:Peer-reviewed. Ask if they attended the last 2 meetings.
- Ask for their SOP binder. It should include:
- Hazard matrices
- Loading photos
- Contact trees for emergencies
Cost-vs-Risk Matrix & Decision Flowchart
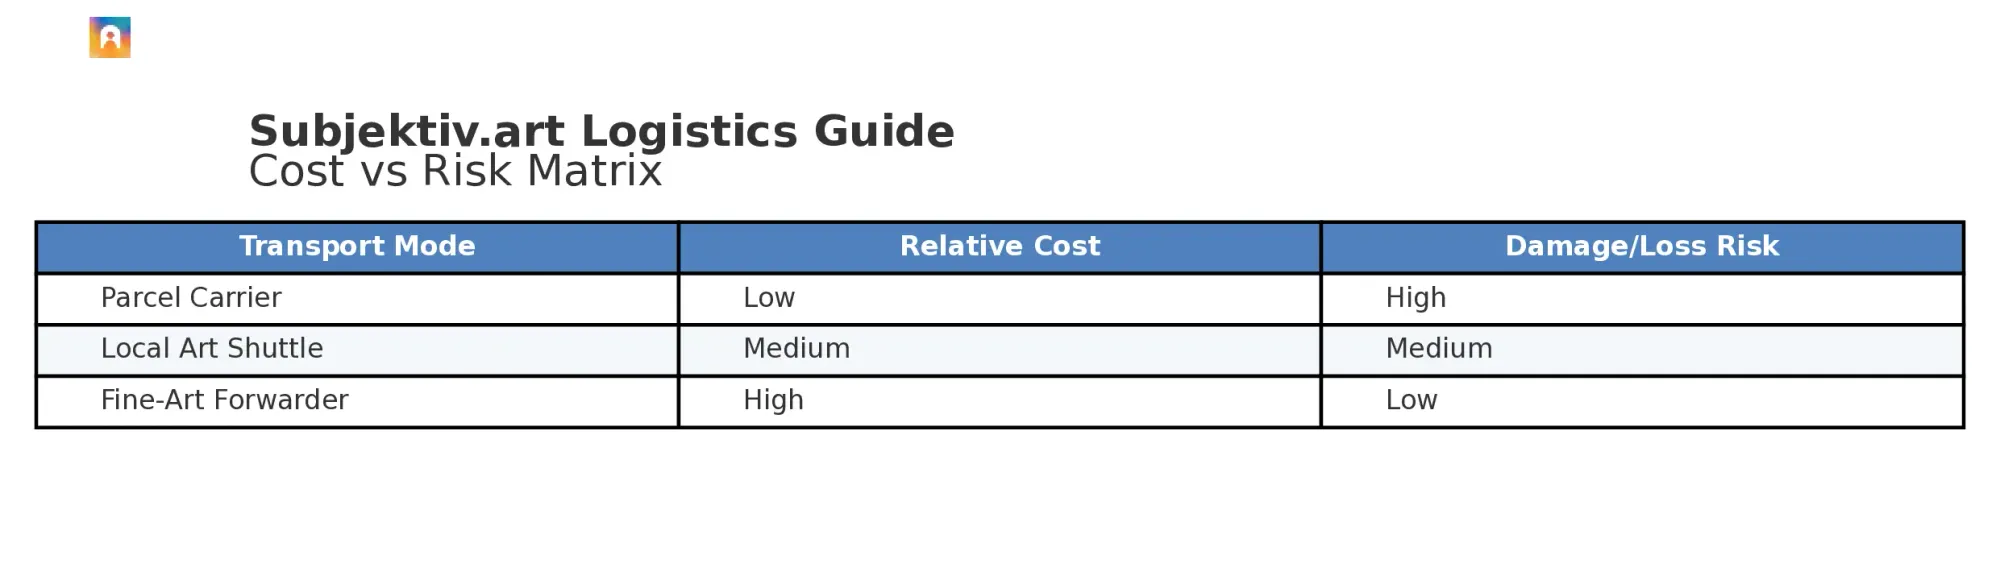
Decision Flow
Is the artwork worth more than €5,000?
- Yes → Use a fine-art forwarder or insured shuttle.
- No → Keep going.
Is the trip under 48 hours and within one climate zone?
- Yes → Use a shuttle or padded parcel carrier.
- No → Use a forwarder or add climate crate + data-logger.
Need installation at the destination?
- Yes → Choose a forwarder with an art-handling crew.
- No → Choose based on value and climate risk.
Print and pin this flowchart at your booking desk. We’ve used a version of it since 2013—with under 0.5% claim rate.
Insurance & Liability Management
Even perfect packing can’t stop every risk. Insurance is your financial safety net. This section breaks down policy types, real claim scenarios, and the documents that help you recover losses fast.
All-Risk vs. Named-Peril Policies
Declared Value & Deductibles
Declared Value: The maximum payout you and the insurer agree on.
- Use replacement cost for in-production pieces.
- Use fair-market value for secondary-market works.
- Include restoration invoices and buyer’s premiums.
Deductible: What you pay before coverage kicks in.
- Expect €500–€2,000 per shipment.
- Bundle crates under one policy to lower per-piece exposure.
9.3 Coverage Gaps (Force Majeure, Delay, War-Risk)
9.4 Filing a Claim: Documentation Toolkit
Submit Within 72 Hours: Most policies void if you wait longer.
Documentation Toolkit
- Photos (within 24 h): Show crate exterior, interior, artwork, and any triggered indicators.
- Condition Reports (Before/After): Must be signed by qualified staff.
- Packing Build Sheet: Includes materials, sequence photos, and any test results.
- Transit Milestones: Waybill scans, GPS or BLE beacon logs showing hand-offs.
- Repair Quotes: Two estimates from conservators with bios or credentials attached.
- Claim Form & Cover Letter: Include policy number, declared value, incident details, and clear facts.
Timeline Hacks
- Notify the insurer in writing within 72 hours or most policies void.
- Keep damaged packing materials until the adjuster signs off—they are evidence.
- Push for partial advances (up to 50 %) on large claims; many insurers allow this once documentation is verified.
Customs & Cross-Border Compliance
Customs is where logistics can fall apart. One wrong code or missing document, and your crate could sit in bonded storage while fees pile up. Use this section as a practical guide for smooth international movement.
Harmonised Codes & Export Licences
Original paintings, drawings, collages
- 9701.10
- When the piece is ≥ 50 years old and valued > €150 000
Original prints, engravings, lithographs
- 9702.00
- Same age threshold, value > €15 000
Photographs, signed & limited editions
- 9702.00.00
- Value > €15 000 regardless of age
Sculptures (any material)
- 9703.00
- Age ≥ 50 y, value > €50 000
*HS codes are harmonised worldwide, but tariff sub-digits can vary; always confirm with the destination broker.
Action Steps:
- Quote the full 10-digit HS code on invoices and packing lists.
- Confirm licence thresholds for both the origin and the EU (if transiting).
- Apply at least 30 days before shipping—many cultural ministries require appraisals.
CITES-Listed Materials (Ivory, Rosewood, Tortoiseshell)
If your artwork includes any endangered species materials—ivory, tortoiseshell, rosewood—CITES (the Convention on International Trade in Endangered Species) rules apply.
Checklist:
- Identify the species and CITES appendix (I, II, or III).
- Get export and import permits from both countries—each issues their own.
- Notify all transit countries. Airlines or customs may request permits in-transit.
- Add the CITES control number beside the HS code on your waybill.
Temporary Import Bonds & Carnets
Execution Tips:
- Carnet: list every piece with reference ID (from Section 3.4).
- TIB: file bond number on the airway bill before arrival.
- Always schedule the return shipment at least 2 weeks before carnet expiry.
Cultural Property Restrictions & Repatriation Risks
Many countries restrict export of national treasures based on age or value. Others demand proof of legal origin to fight looting. (e.g., Italy’s 70-year rule, Egypt’s blanket ban on antiquities). Meanwhile, importing countries may demand provenance proof to deter looted art.
Red Flags:
- No clear provenance for items listed under the UNESCO 1970 Convention.
- Works from countries with "Red Lists" (Iraq, Syria, Mali).
- Imports into the EU of cultural goods ≥ 200 years old without a valid licence.
To Mitigate:
- Assemble full provenance: invoices, catalogues, restoration records—scan as one PDF.
- Request a no-objection certificate from the country of origin when in doubt.
- Use forwarders experienced in archaeological or ethnographic shipments.
Subjektiv.art Pro Tips: Studio-Ready Tricks
This section gives you rapid, field-tested tricks, vendor recommendations, and ready-to-use checklists to make packing faster, smarter, and more repeatable.
Grab-and-Go QR Checklists
Use these to simplify every stage—from studio to install.
- Studio Pack-Out (A3, one-pager)
- Courier Hand-Off & Photo Angles
- Uncrating & Install Checklist
Scan each QR code once, then save to your phone’s Notes app. No login or data use required.
Trusted Vendors (Q1 2025)
We don’t take kickbacks. These are providers we’ve used, trusted, and seen deliver—damage-free and on time.
EU – North
- Fine-Art Couriers / Forwarders: Hasenkamp (DE), Constantine (UK), Momart (UK)
- Archival Materials & Crating: PEL (UK), G. Ryder & Co. (UK)
EU – South & Central
- Fine-Art Couriers / Forwarders: Chenue (FR), Apice (IT), Kunsttrans (AT)
- Archival Materials & Crating: Klug Conservation (DE), Passepartout (IT)
North America – East
- Fine-Art Couriers / Forwarders: Crozier (US), Atelier 4 (US), UOVO (US)
- Archival Materials & Crating: Talas (US), Archivart (US)
North America – West & Midwest
- Fine-Art Couriers / Forwarders: Terry Dowd Inc. (US), Dietl Intl. (US)
- Archival Materials & Crating: Gaylord Archival (US), University Products (US)
Packing Diagram Templates (.PDF / .AI)
- Layer-by-layer diagrams for paintings, paper works, and sculpture
- Editable Illustrator files (CMYK print profiles)
- Pre-labeled fields—just drop in dimensions and material codes
Ultimate Checklists & Templates
Copy–paste, print, or drop these into your project-management app—each list mirrors the workflows in earlier sections so nothing falls through the cracks.
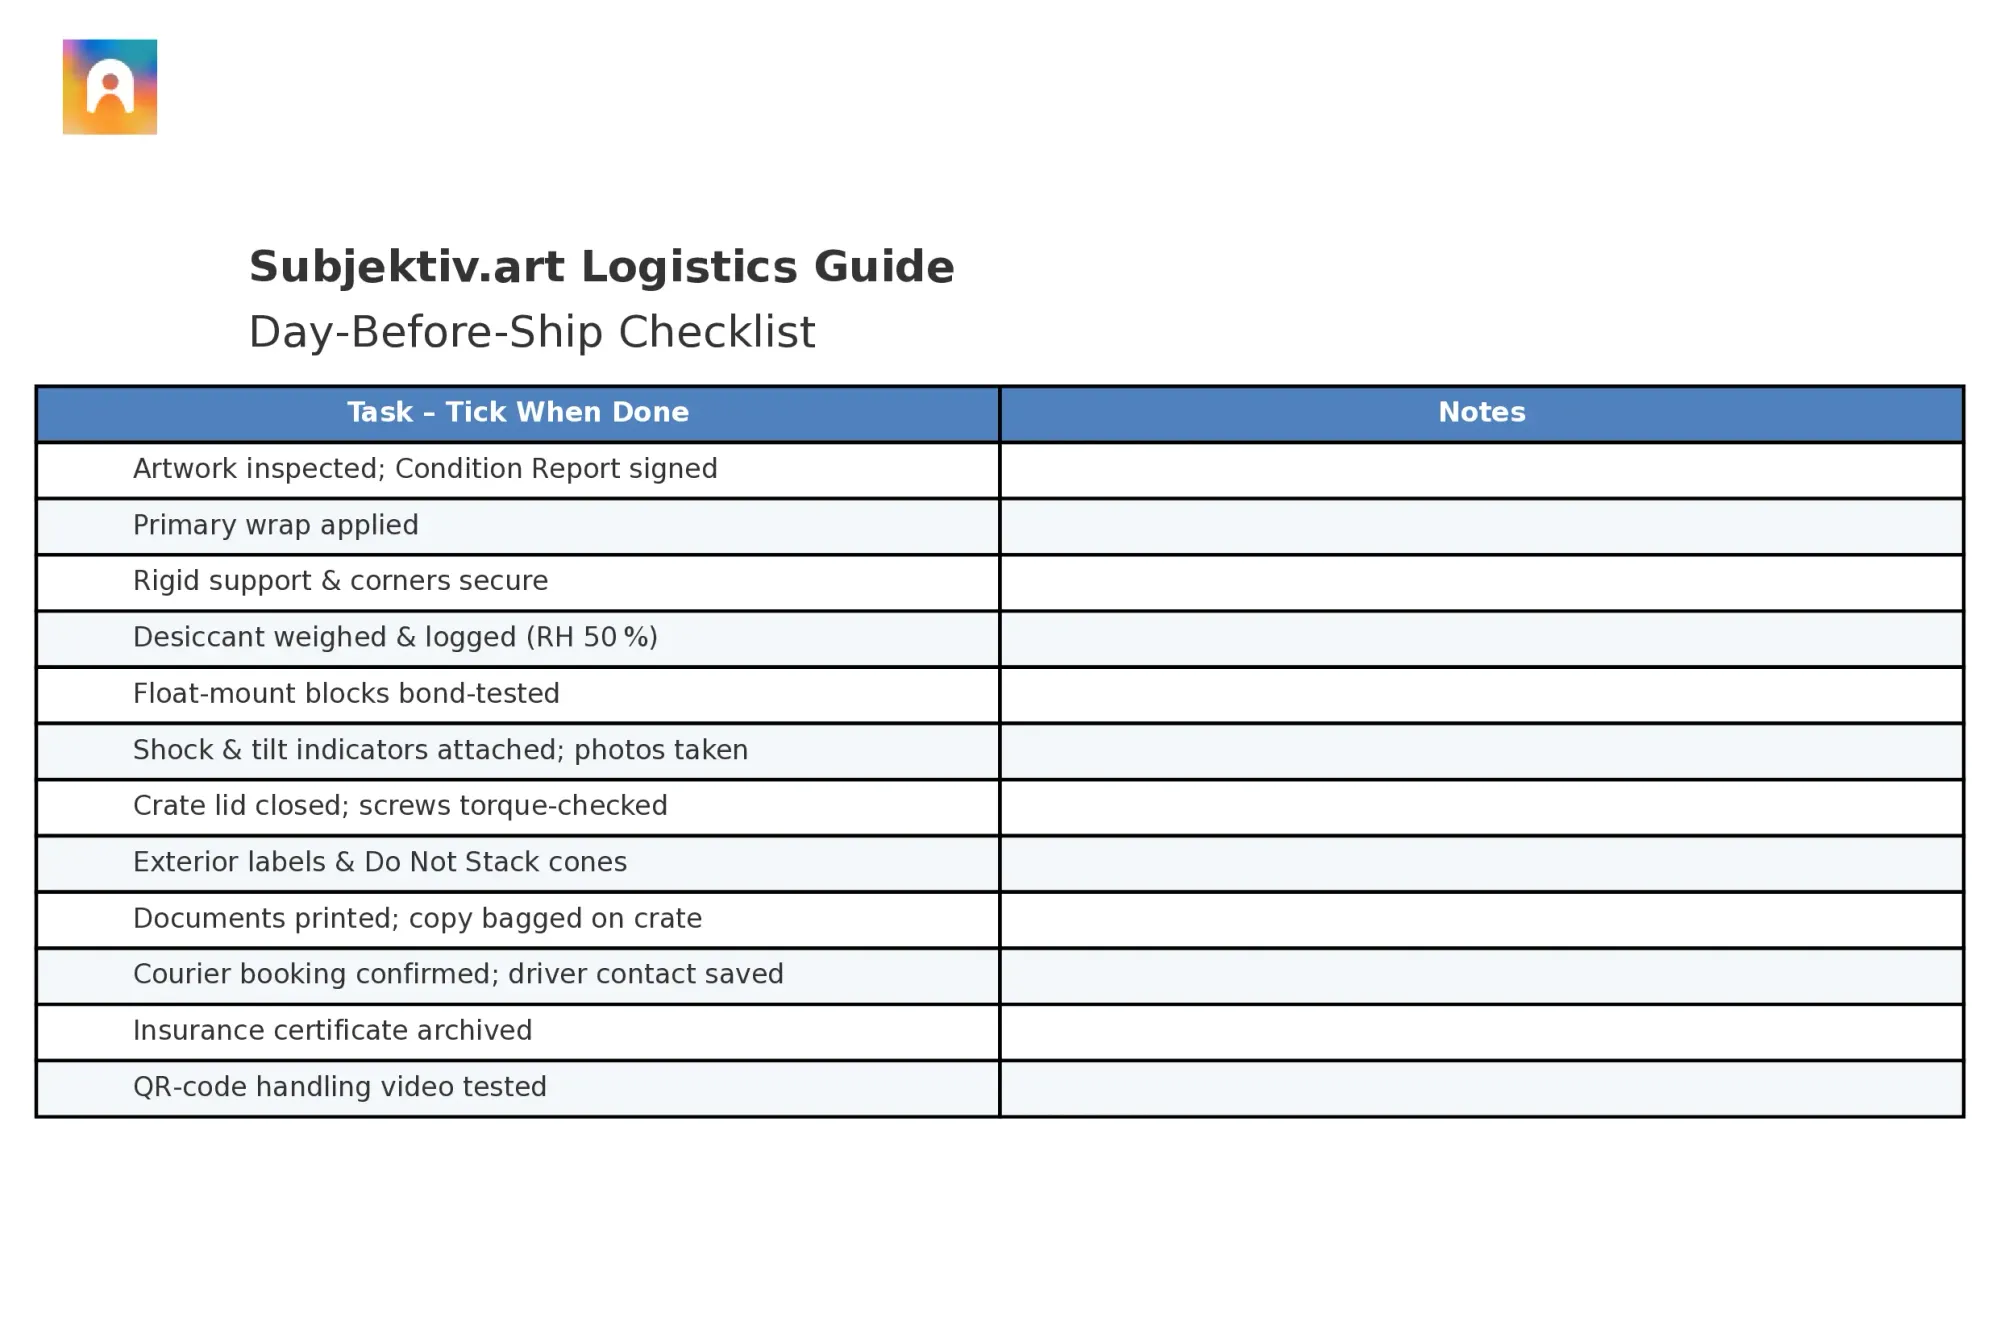
“Day-Before-Ship” Preparation Checklist
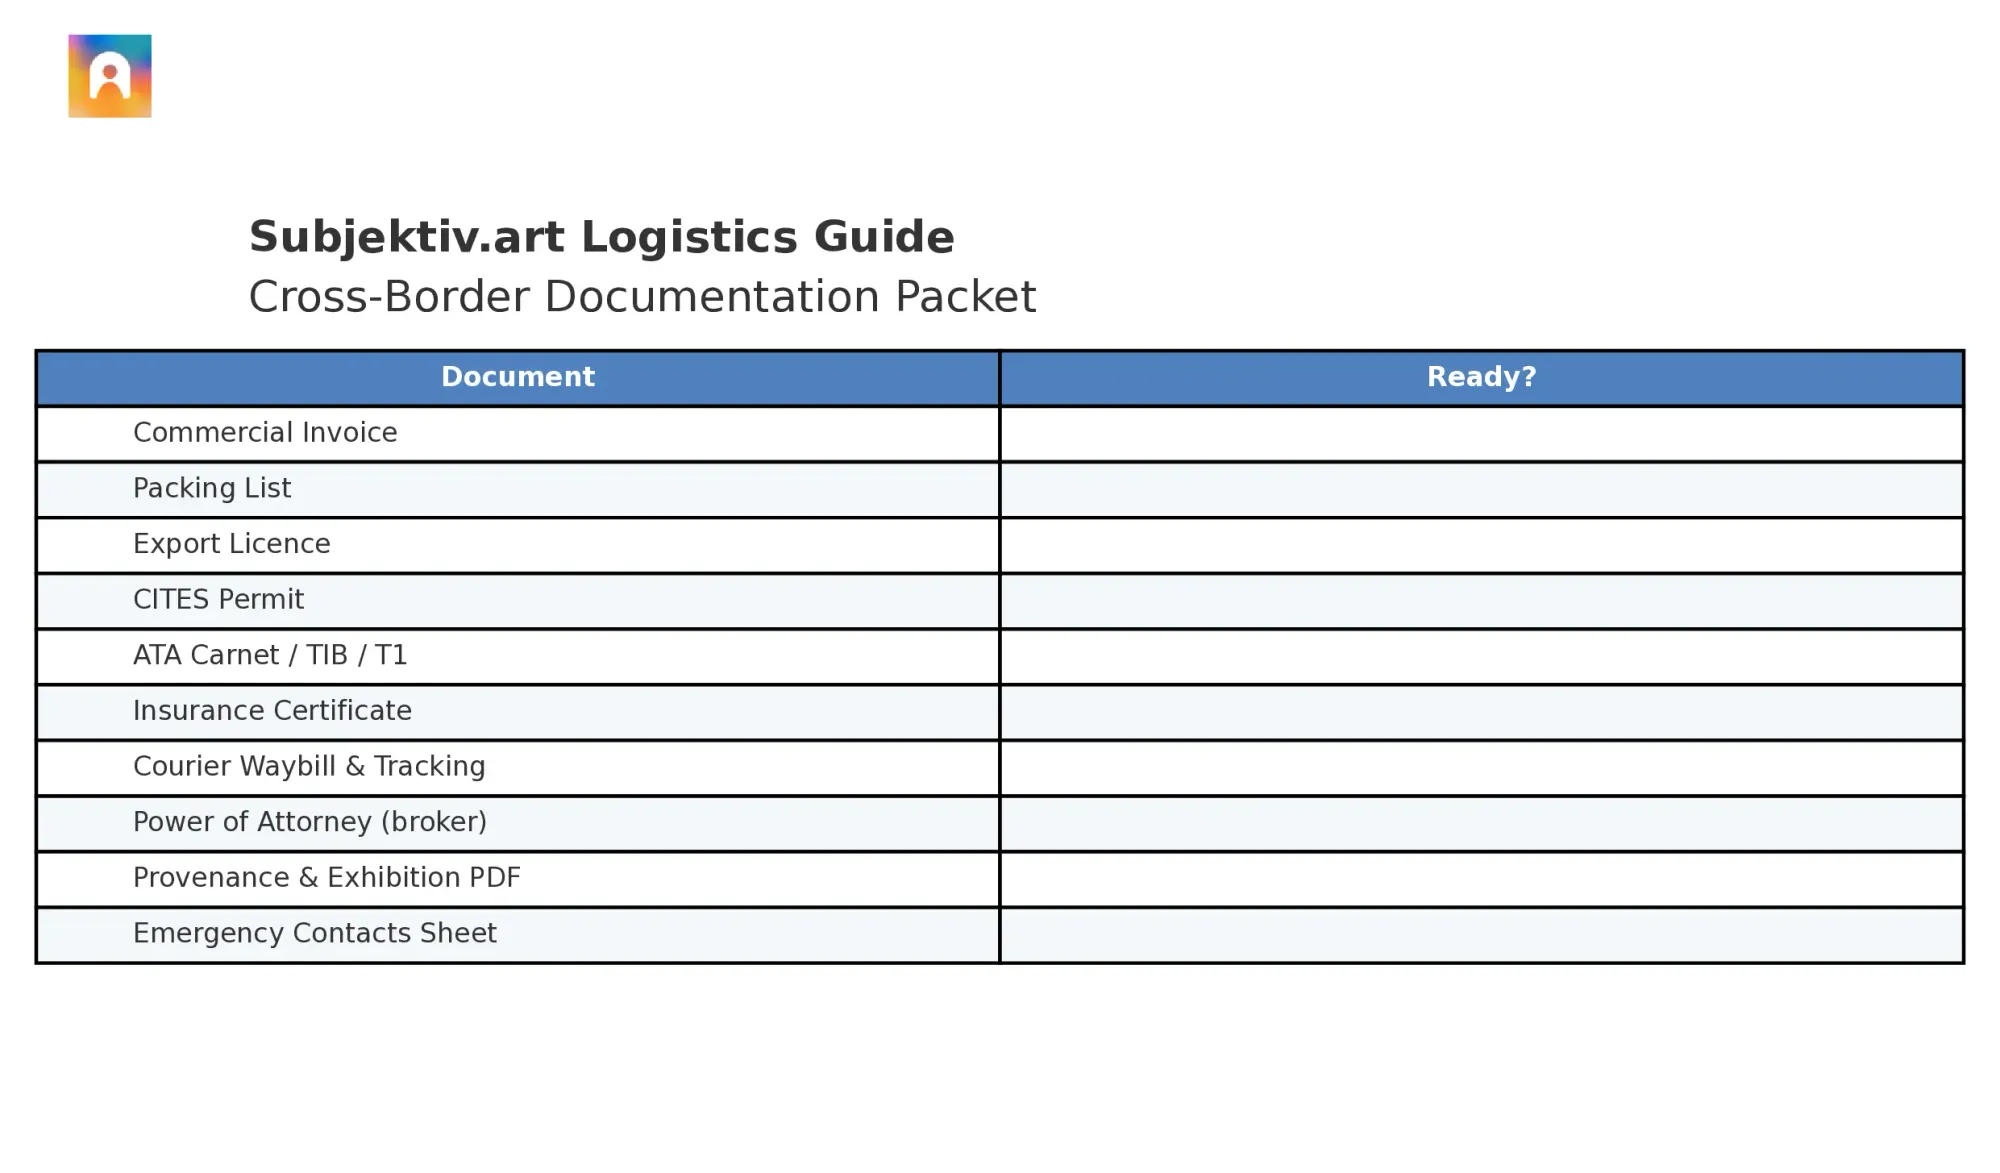
Cross-Border Documentation Packet
Post-Unpack Evaluation Sheet